It always starts with the same little shock. You’re brushing your teeth, you glance down, and suddenly you really see the state of the grout between your tiles. That grey, yellowish, slightly sticky look that no mop ever seems to fix. You scrub a bit with your fingernail, a corner comes off, and you realise: this used to be white. Bright white. When did it become… this?
You think about the hours you’ve already spent with chemical sprays that sting your eyes. About kneeling on the cold floor, old toothbrush in hand, promising yourself “this time I’ll keep it clean”. Then life happens, the kids spill juice, the dog walks in with muddy paws, and the grout slowly drinks it all in. One day you wake up and your bathroom looks tired, even when everything’s technically clean.

A lot of people quietly dream of ripping out tiles and starting from scratch. But before you imagine a renovation budget, there’s one small, almost suspiciously simple trick many home-owners are whispering about. Three basic ingredients, a quick paste, and fifteen minutes of patience.

Why dirty grout makes your whole home look tired
Walk into any bathroom showroom and notice what your eye catches first. Not the fancy taps or the tropical shower, but the razor-sharp contrast between pure tiles and razor-thin white lines. Grout is like eyeliner for your floor and walls: when it’s clean, everything else looks sharper. When it’s dingy, the whole room feels vaguely… unwashed, even if you’ve just scrubbed every surface.

That’s why so many people feel defeated in their own homes. The mirror shines, the sink is spotless, you’ve used your nicest cleaning spray, yet the room still whispers “not quite clean”. The culprit is usually those thin lines holding your tiles together, quietly soaking up soap scum, limescale and the dust no mop can really grab. It’s not dirt on the surface — it’s dirt inside the material.
A woman I interviewed in Lyon put it perfectly: “I used to clean until my back hurt, then sit on the toilet lid and stare at the grout, feeling like I’d failed.” She’s not alone. Surveys from cleaning brands regularly show grout and oven racks in the top 3 “most hated” cleaning tasks. Not because they’re huge jobs, but because they feel pointless. You scrub, it looks the same. You buy stronger products, the smell gets worse. At some point, people just give up and stop seeing the grout at all — until a guest comments on it.
There’s a plain truth here that nobody likes to admit. **Let’s be honest: nobody really scrubs grout lines every single day.** We’re busy. We clean what shows, what smells, what’s sticky under our feet. Grout quietly sinks into a long-term relationship with moisture, soap, dust and bacteria. Then one day, the lights hit it at a different angle and you see everything at once. That’s usually when people start searching for miracles.
The 3-ingredient grout paste that feels like cheating
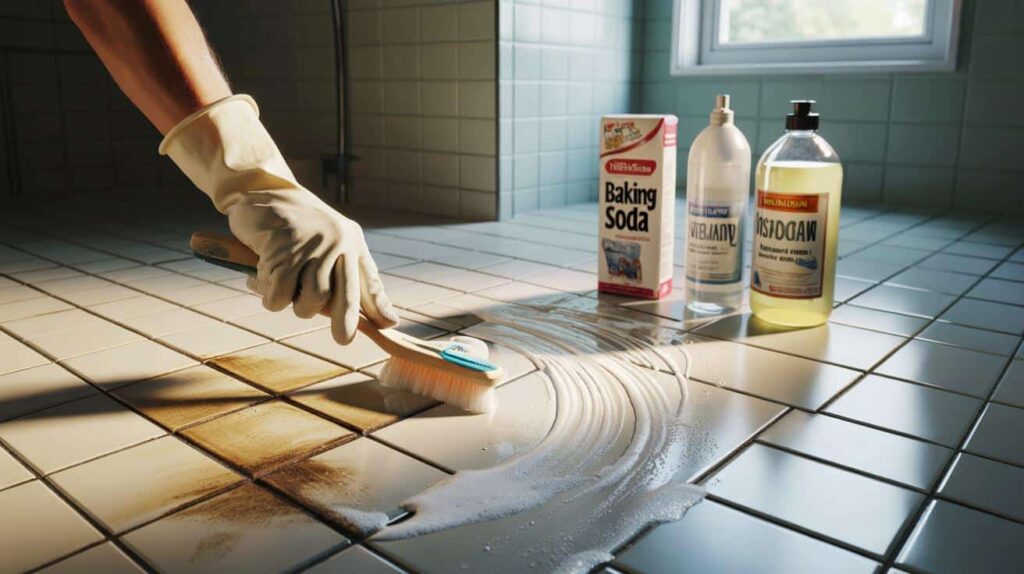
Here’s the “miracle” that isn’t really a miracle at all, just smart chemistry with things you probably already have. Grab three ingredients: baking soda, white vinegar and a mild dish soap. That’s it. No toxic fumes, no industrial bleach. In a small bowl, mix about 3 tablespoons of baking soda with 1 tablespoon of dish soap. Then slowly add vinegar, teaspoon by teaspoon, until you get a creamy paste that clings to the grout without sliding off.
When you try this for the first time you will likely notice the small bubbling reaction that happens when vinegar meets baking soda. This bubbling action helps with the cleaning process. After you mix the paste apply it liberally onto the grout lines using an old toothbrush or a small cleaning brush. You do not need to scrub right away. Simply cover the lines with paste and wait for approximately 15 minutes. During this waiting period the chemical reaction does much of the work that would normally require physical effort.
One reader told me she tried this in her rental flat, fully convinced it wouldn’t work on “10‑year-old student grime”. She snapped a quick “before” photo, laid the paste, made a coffee, and came back. In her words: “I rubbed with the brush twice and the brown just… lifted. I actually laughed alone in my bathroom.” She sent the landlord the photos later. He asked if she’d changed the grout. That’s the trick: when the paste has had time to act, the scrubbing feels less like punishment and more like wiping away something that’s already given up.
➡️ New York City just laid the first brick of a system terrifying Big Tech giants
➡️ Landlord helps himself to fruit in tenant garden calling it his property a legal gray area that tears opinions apart
➡️ Auto technicians explain how keeping the gas tank above half prevents fuel line freeze
# No More Gaping Holes After Removing Wall Plugs: The Trick to Restore a Wall Without a Trace
Removing wall plugs often leaves behind unsightly holes that can ruin the appearance of your walls. Whether you are moving to a new place or simply redecorating your current space dealing with these holes is a common challenge that many homeowners face. The good news is that fixing these imperfections does not require professional help or expensive tools. Understanding why wall plugs leave such noticeable damage is the first step toward solving the problem. When you insert a wall plug into drywall or plaster it creates a hole that is often larger than the screw itself. Removing the plug can cause the surrounding material to crumble or crack making the hole even bigger. This is especially true for older walls or those made from softer materials. The most effective method for repairing these holes involves using spackling paste or joint compound. These materials are specifically designed to fill gaps in walls and create a smooth surface that blends seamlessly with the surrounding area. You can find them at any hardware store, & they are affordable and easy to use even for beginners. Start by cleaning the hole & removing any loose debris or crumbling material. Use a putty knife to scrape away anything that might prevent the filler from adhering properly. If the hole is particularly large you might need to insert a small piece of mesh tape or a wall repair patch to provide support for the filler material. Apply the spackling paste or joint compound with a putty knife, pressing it firmly into the hole. Make sure to overfill the hole slightly, as the material will shrink as it dries. Smooth the surface as much as possible with the knife, feathering the edges outward to blend with the wall. This technique helps avoid creating a noticeable bump once the repair is complete. Allow the filler to dry completely according to the manufacturer’s instructions. This usually takes a few hours, but larger repairs might need more time. Once dry, sand the area gently with fine-grit sandpaper until it feels smooth to the touch and sits flush with the surrounding wall. Wipe away any dust with a damp cloth before proceeding to the next step. If the repaired area still shows slight imperfections, apply a second thin layer of filler and repeat the sanding process. Multiple thin layers always produce better results than one thick application. This approach gives you more control over the final appearance & reduces the risk of cracking. The final step involves painting over the repaired area to match the rest of your wall. Use the same paint that was originally applied to the wall if possible. If you do not have the original paint, bring a small chip of the wall paint to a hardware store where they can match the color for you. Apply the paint with a small brush or roller, extending slightly beyond the repaired area to ensure a seamless blend. For textured walls, you will need to recreate the texture before painting. You can do this by dabbing the wet filler with a sponge or using a special texturing tool. Practice on a piece of cardboard first to get the technique right before applying it to your wall. Some people prefer using toothpaste as a quick fix for small holes. While this might work temporarily for tiny nail holes, it is not a permanent solution. Toothpaste can discolor over time and does not have the same structural integrity as proper wall filler. For lasting results always use products designed specifically for wall repair. Another alternative for very small holes is using a white crayon or bar of soap. Simply rub it over the hole until it fills in, then smooth it with your finger. This method works best for minor imperfections that are barely visible and will not be subjected to close inspection. Prevention is always better than cure. When hanging pictures or shelves, consider using adhesive hooks or strips that do not require drilling. These products have improved significantly in recent years and can hold surprising amounts of weight without damaging your walls. They are especially useful for renters who want to avoid losing their security deposit. If you must use wall plugs, choose the smallest size that will adequately support your item. Larger plugs create bigger holes that are more difficult to repair. Also consider the wall material before selecting your anchors. Different types of walls require different fastening solutions. Knowing how to repair wall damage is a valuable skill that saves money & maintains the appearance of your home. With the right materials and a bit of patience, you can make those unsightly holes disappear completely. The process is straightforward enough for anyone to master, regardless of their experience with home repairs. Taking the time to properly fix wall holes also increases your home’s value and appeal. Whether you are preparing to sell or simply want to enjoy a well-maintained living space, these simple repairs make a significant difference. Clean walls without visible damage create a more polished & professional appearance throughout your home.
# Should You Turn Your Heating On and Off or Leave It Running on Low
Many homeowners wonder whether they should switch their heating system on and off throughout the day or simply leave it running at a lower temperature. This question affects both comfort levels & energy bills.
## The Case for Turning Heating On and Off
Most energy experts recommend turning your heating off when you don’t need it rather than leaving it on continuously. Modern heating systems warm up rooms relatively quickly so you won’t be left in the cold for long periods. When you turn your heating off the system stops using energy completely. This approach works particularly well if you have a regular schedule. You can program your thermostat to heat your home before you wake up and return from work while keeping it off during empty hours.
## Why Leaving Heating on Low Seems Appealing
Some people believe that maintaining a constant low temperature uses less energy than repeatedly heating a cold house. The logic suggests that your system works harder to raise the temperature from cold to warm than to maintain an existing temperature. However this theory doesn’t hold up in practice. Your home loses heat to the outside environment continuously. The warmer your house compared to the outside temperature the faster it loses heat. When you maintain a constant temperature your heating system must run frequently to replace the heat that escapes.
## What Actually Saves Money
 If the ATM keeps your card, this fast technique instantly retrieves it before help arrives
Physics tells us that you use less total energy when your home is cooler for longer periods. Every minute your heating is off or set lower means less heat escaping through walls and windows. The most efficient approach involves heating your home only when needed. Set your thermostat to lower temperatures when you’re asleep or away. Modern programmable thermostats make this easy by automatically adjusting temperatures based on your schedule.
## Practical Tips for Efficient Heating
Start by identifying when you actually need full heating. Most people sleep comfortably at lower temperatures & obviously don’t need heating when away from home. Program your thermostat to reduce temperatures by several degrees during these periods. Even small reductions make a noticeable difference on your energy bills over time. Consider your home’s characteristics too. Well insulated homes retain heat longer so they can handle longer periods with heating turned off. Older homes with poor insulation lose heat quickly and might need more frequent heating cycles.
## The Bottom Line
Turning your heating off or down when you don’t need it saves more energy than leaving it on low continuously. Your heating system doesn’t work significantly harder to warm up a cool house compared to maintaining a constant temperature. The real energy waste comes from heat constantly escaping while you try to maintain that steady temperature. Set up a heating schedule that matches your lifestyle. Your comfort won’t suffer and your energy bills will thank you for it.
➡️ A centenarian reveals the daily habits behind her long life and why she says, “I refuse to end up in care”
➡️ “No one explained how to do it”: their firewood stored for months was actually unusable
➡️ Bad news for scientists who counted humanity they may have miscalculated how many people are on earth and the shocking error is already dividing experts
Why does this combination work so well on old stains? Baking soda acts as a mild abrasive and natural deodorizer that lifts surface buildup and odors without damaging tiles. Vinegar contains acid that dissolves mineral deposits and soap scum stuck deep in grout pores. Dish soap removes grease from body oils and cooking residue that accumulates over time. When combined these ingredients penetrate the tiny pores of grout and break down trapped dirt so your brush can work more effectively. You’re not just cleaning the surface but actually loosening grime from within.
How to apply it like a pro (and what people usually get wrong)
Here’s the simple method people who swear by this trick actually follow. First, sweep or vacuum the tiled area so you’re not scrubbing dust into the grout. Then, if the floor is really grimy, pass a quick damp mop and let it dry a little. You want the grout slightly receptive, not swimming in water. Then prepare the paste right before using it, so the fizzing reaction is still active on your tiles.
Work on small areas at a time. Focus on one hallway or half a bathroom or a single kitchen corner. Apply the paste along the grout lines & then leave it alone. This is the step where most people make mistakes. They get too eager and begin scrubbing before the mixture has properly loosened the dirt. Let the cleaning product do the heavy lifting instead of straining your arms & back. Wait for 10 to 15 minutes before returning with your brush. Use short strokes back and forth along each grout line. Avoid scrubbing the tile edges too aggressively as if you were working with sandpaper on wood. Grout can handle pressure but it is not impossible to damage.
Another common mistake is not rinsing well enough. When you leave behind a layer of baking soda and soap it will attract new dirt quickly and make you think the cleaning method does not work for long. After you finish scrubbing you need to wipe the area with a damp microfiber cloth or mop that has been rinsed multiple times. The water you use should look clear. Let everything dry completely before you decide if the cleaning worked because wet grout always appears darker than it actually is.
There is also the emotional trap. People try this on grout that is actually damaged and not just dirty and then feel disappointed. Crumbling or cracked grout that has mould damage often needs repair or replacement instead of just cleaning. And that is okay to admit. A reader from Manchester told me:
I thought the grout in my shower was just dirty. When I finished cleaning it I realized that some of it was actually missing. That discovery made me feel better in a strange way because it meant I was not a bad cleaner. The problem was simply that the grout had disappeared over time.
If your grout looks stained but structurally fine, this method is your friend. If it’s black with mould in damp corners or literally falling apart, think of this as a first diagnostic step. The paste will still freshen it and reduce smell, but it won’t rebuild what’s no longer there. Sometimes cleaning is a way of seeing clearly what needs changing.
For a quick recap, here’s the “good habits” box many readers end up sticking on their fridge:
- Vacuum or sweep tiles before treating grout
- Mix baking soda, dish soap, then add vinegar slowly
- Apply in small sections and let sit 10–15 minutes
- Brush gently, focusing on the lines, not the tiles
- Rinse thoroughly and let dry before judging the result
When grout starts looking new, the room feels new too
The funny thing about clean grout is that nobody notices it directly. Friends walk into your kitchen, tilt their head and say, “Have you changed something? It looks brighter.” They can’t quite put their finger on it. The tiles are the same, the furniture too. Yet the whole surface reads differently. It’s a bit like getting a fresh haircut that quietly frames your face better.
You notice the change and suddenly you want to tackle other neglected spots in your home. That hallway you walk past without really seeing it anymore. The entryway where dirty shoes pile up. The outdated rental bathroom you assumed would always look terrible. This simple three-ingredient mixture does more than just clean surfaces. It helps you reclaim spaces you had given up on as permanently dingy. That sense of control matters more than most people realize.
Some people do this every month while others wait until the season changes and the light makes everything look worse. You do not need to become someone who keeps perfect grout in every corner of the house. The real win is simple and small. In just fifteen minutes you can use basic items from your kitchen to restore something you thought was beyond saving. That small physical change often makes you feel like you can tackle other improvements in your home & life.
| Key point | Detail | Value for the reader |
|---|---|---|
| 3-ingredient paste | Baking soda + dish soap + white vinegar, mixed to a creamy texture | Uses cheap, accessible products instead of harsh chemicals |
| 15-minute wait | Let the paste sit on grout lines before scrubbing lightly | Reduces physical effort and improves cleaning power |
| Good rinsing & small sections | Work area by area, wipe thoroughly with clean water | Longer-lasting results and less residue that attracts new dirt |
FAQ:
- Can I use this mix on coloured grout?Yes, if your grout is coloured but not painted. Test a small hidden area first and scrub gently. If no colour comes off on the cloth and the tone stays even after drying, you’re good.
- Is vinegar safe for all tiles?Vinegar should not be used on natural stone like marble, travertine or limestone. For those, skip the vinegar and use only baking soda, a tiny bit of dish soap and warm water.
- How often should I deep-clean grout like this?For normal use, every 1–3 months is plenty. In very busy kitchens or family bathrooms, you might repeat it monthly on the most exposed areas.
- What kind of brush works best?An old toothbrush is fine for small areas. For floors, a stiff nylon grout brush with a handle is more comfortable and lets you apply regular, controlled pressure without damaging the grout.
- Will this remove black mould permanently?It can lighten surface mould and reduce smell, but deep black mould in constantly damp areas usually comes back. That often signals ventilation or sealing issues that need fixing, not just cleaning.