The tiles are spotless. Sunlight hits the floor and everything gleams… except for those thin, gloomy lines in between. The grout. Grey, yellow, almost black in the busiest spots. You notice it when you walk barefoot to the kitchen in the morning, coffee in hand. The floor that once looked “magazine perfect” suddenly feels tired, a little bit sad, like someone wearing beautiful clothes with dirty shoelaces.
You try not to see it. You wipe, you mop, sometimes you crouch down with an old sponge and a vague sense of guilt. Then one day a guest drops this sentence: “Your tiles are gorgeous.” Pause. “You should really do something about the grout, though.”

That’s the moment the floor starts haunting you.

There is a way out that doesn’t smell like a swimming pool.

Why grout turns black faster than your patience
At first, grout looks harmless. Light, even, almost invisible. Then life happens. Cooking, shower steam, muddy shoes, pets sliding across the hallway like tiny furry mops. Grout is porous, like a sponge set between your tiles, quietly collecting everything the rest of the floor refuses.
Each mop bucket you pass over those lines pushes dirty water into the joints. A little bit of soap, a bit of grease, some dust. Over months, all that builds up into a dark, sticky film that clings to the grout. *That’s when you start scrubbing harder and harder, and the grout only looks worse.*
I watched this happen in a small rental kitchen that had once been bright and white. The tenant, a young teacher, swore she mopped twice a week with a citrus-smelling floor cleaner. Her tiles shone. Her grout looked like someone had outlined every square with a black pen.
She confessed she’d already tried “everything from TikTok”: vinegar, lemon juice, even a bit of bleach “just this once”. The smell drove her out of the room, her eyes stung, and the grout still kept a dirty shadow. Only near the fridge could you see the original pale color, a small rectangle of what used to be. It felt almost unfair.
The problem comes down to basic chemistry combined with poor cleaning choices. When you use acidic cleaners like vinegar they don’t just remove dirt. They actually eat away at the cement in your grout and make the surface rougher than before. That rougher texture then catches even more dirt over time. If you switch to harsh bleach instead it might lighten the stains you can see but it damages the structural integrity of the grout & releases fumes that can hurt your respiratory system.
Then the daily mop comes back with its soapy, slightly dirty water. The joints, already damaged, drink it up. The more you clean this way, the darker the grout looks. Let’s be honest: nobody really does this every single day with perfect technique. We grab what’s under the sink and hope for the best. The floor quietly keeps the score.
➡️ The hidden nutritional deficiencies that cause fatigue, depression, and poor immune function
➡️ Neither Vinegar Nor Soap : The Simple Trick To Remove Limescale From An Electric Kettle
➡️ Bad news : a new rule prohibits mowing lawns between noon and 4 p.m. in 23 departments
If an ATM keeps your card you can use this quick method to get it back before assistance shows up. When an ATM swallows your card it creates immediate stress. Most people assume they must wait for bank staff or contact customer service. However there is a faster approach that works in many situations. The machine typically holds cards in an internal compartment for security reasons. Banks design ATMs to retain cards when they detect suspicious activity or when users take too long to remove them. The card usually stays accessible for a brief period before moving to a secure collection box. You have a short window to act. The first step involves checking if the machine is still in an active session. Look at the screen for any prompts or messages. Some ATMs display instructions for retrieving retained cards immediately after the incident occurs. Try pressing the cancel button several times in quick succession. This action sometimes triggers the machine to reverse its card retention process. The ATM may recognize the cancellation as a signal to return the card to the slot. Another technique involves inserting your PIN again if the machine allows it. Some systems interpret this as verification that the rightful owner is present and release the card. This method works best within the first minute after retention. Check around the card slot for a small reset button or emergency release mechanism. Certain ATM models include these features for situations exactly like this. The button is usually recessed to prevent accidental activation. If these immediate actions fail you should contact the bank right away. Call the customer service number displayed on the machine or use your mobile banking app. Report the retention and verify your identity. The bank can sometimes remotely trigger a card release or provide specific instructions for that particular ATM model. Document everything about the incident. Note the exact time, location and any error messages displayed. Take photos of the screen if possible. This information helps when filing reports or disputing unauthorized transactions. While waiting for help monitor your account through mobile banking. Watch for any suspicious activity since a retained card might indicate a security concern. Enable transaction alerts if you have not already done so. Prevention matters as much as recovery. Always stay alert at ATMs and shield your PIN entry. Take your card promptly after each transaction. Avoid using machines in isolated areas or those that appear tampered with. Understanding why ATMs retain cards helps you avoid future incidents. Common triggers include entering wrong PINs multiple times exceeding transaction limits or leaving the card in the slot too long. Technical malfunctions also cause unexpected retentions. Banks eventually collect retained cards from the machines during regular servicing. If you cannot retrieve your card immediately it will likely be destroyed for security purposes. You will need to request a replacement card through normal channels. The replacement process typically takes several business days. During this period you can use mobile payment options or a backup card if available. Some banks offer emergency card services for urgent situations. This quick retrieval technique works best when applied immediately. The longer you wait the less likely the card remains accessible. ATM systems move retained cards to secure storage after predetermined time intervals. Remember that card retention often serves as a security feature protecting your account. While inconvenient it prevents unauthorized access when something seems wrong. The system prioritizes your financial safety over convenience. Knowing this fast method gives you an advantage in stressful moments. You can potentially solve the problem yourself without lengthy waits or complicated procedures. However always prioritize safety and follow official bank protocols when the simple techniques do not work.

➡️ China Builds A ‘Non‑Rotating’ Heat Pump That Turns Sound Into Heat To Capture Industry’s Lost 27%
The US Navy has reached a major technological milestone by becoming the first military force to integrate autonomous surface vessels into a carrier strike group. This development represents a fundamental shift in naval warfare capabilities and operational strategy. The deployment marks the first time that unmanned surface ships have been incorporated into the core structure of a carrier battle group. These autonomous vessels operate alongside traditional warships and can perform various missions without direct human control. The technology allows the ships to navigate independently while maintaining coordination with manned vessels in the strike group. This integration demonstrates the Navy’s commitment to modernizing its fleet through advanced automation and artificial intelligence. The autonomous ships can extend the operational range of the carrier group and provide additional surveillance and reconnaissance capabilities. They also reduce the risk to human personnel during dangerous missions. The vessels use sophisticated sensor systems and navigation technology to avoid collisions and respond to changing conditions at sea. They can communicate with other ships in the group and receive updated orders as situations develop. The system includes safeguards that allow human operators to take control when necessary. Military analysts view this deployment as a significant advancement in naval power projection. The autonomous ships provide the carrier group with enhanced flexibility & the ability to cover larger areas of ocean. They can perform tasks such as mine detection and electronic warfare support while freeing up manned vessels for other duties. The successful integration of these autonomous systems into active carrier operations sets a precedent for future naval development. Other nations are watching closely as they develop their own unmanned maritime capabilities. This technology could reshape how naval forces operate in contested waters & during extended deployments. The Navy plans to expand the use of autonomous vessels across its fleet based on the results of this initial deployment. The lessons learned will inform future designs & operational procedures for unmanned surface warfare.
➡️ Living in this French city in 2030 could be far harder than you think: get ready to move
➡️ Hairstyles after 60 are changing, as professional hairstylists say this specific haircut is now considered the most youthful and flattering
The no-vinegar, no-bleach hack that actually works
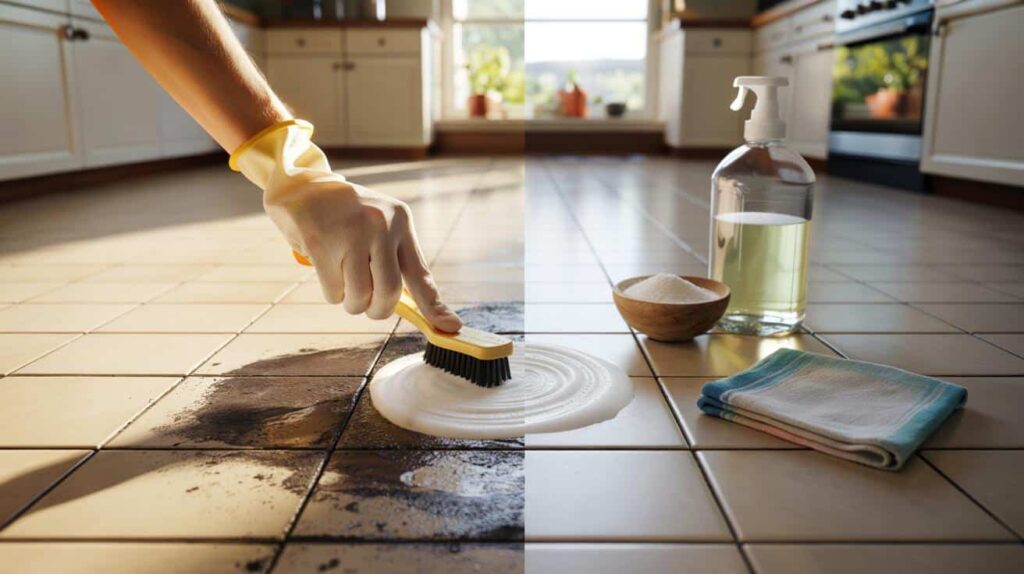
The quick hack starts with a dry step, not a wet one. That’s the first surprise. You’ll need three simple things: baking soda, a mild dish soap, and an old toothbrush or small nail brush. Nothing exotic, nothing that smells like a lab.
Sprinkle baking soda directly onto the dry, blackened grout. Don’t drown it, just a thin, visible line. Add one or two tiny drops of dish soap on top, then lightly dampen your brush under the tap and start scrubbing along the line. The mix turns into a gentle paste that clings to the grout and lifts the greasy film without stripping it.
Work on small sections of about one square meter at a time and then take a pause before moving to the next area. Use a clean damp microfiber cloth to wipe away the grey slurry that you have just loosened from the surface. The grey residue you see is actually the permanent dirt that is finally coming off.
The biggest mistake people make when cleaning grout is being too aggressive right from the start. When you notice those dark lines between your tiles you might feel the urge to grab the strongest products available like undiluted bleach or abrasive scrubbing pads or even metal tools. This approach might make things look cleaner for a few days but then the grout starts to break down or gets stained worse than before. The problem is that grout is actually quite porous and delicate despite seeming like hard material. When you attack it with harsh chemicals or rough scrubbing you end up damaging the surface and making it even more vulnerable to dirt and moisture. The tiny holes in the grout get bigger and trap more grime. A better method is to start gentle and only increase intensity if needed. Begin with warm water and a basic cleaning solution made from dish soap or baking soda mixed with water. Use a soft brush or even an old toothbrush to work the cleaner into the grout lines with steady pressure rather than aggressive scrubbing. If that doesn’t work you can move up to a mixture of hydrogen peroxide and baking soda which creates a mild cleaning paste. Let it sit on the grout for ten minutes before scrubbing. This gives the cleaner time to break down the dirt without you having to damage the grout through excessive force. For stubborn stains you might need a commercial grout cleaner but always follow the instructions and test it in a hidden spot first. After cleaning make sure to rinse thoroughly with clean water because leftover cleaning products can actually attract more dirt. The final step that most people skip is sealing the grout once it’s clean and completely dry. Grout sealer fills those porous holes and creates a protective barrier that makes future cleaning much easier and prevents stains from setting in as deeply.
The key to success with the baking soda and dish soap method is taking your time & not scrubbing too hard. Apply the paste to the dirtiest spots and wait three to five minutes before you start cleaning. Avoid using too much water because it will spread the grime around instead of removing it. Keep two cloths ready: use a damp one to wipe away the mixture and a nearly dry one to polish the tiles when you finish. This process requires some patience but the results are surprisingly rewarding & you might find yourself wanting to clean more surfaces.
People think grout is ruined when it is just covered. A professional cleaner I spoke to explained this common mistake. Nine times out of ten the original color is still there under a greasy layer. You just need the right combination of mild alkali and a bit of surfactant and elbow grease. The cleaner emphasized that most homeowners give up too soon. They see dark lines between tiles & assume the grout has permanently stained. In reality those dark lines are usually just buildup from cooking oils & soap residue & general household grime. The solution does not require expensive specialty products. A mild alkaline cleaner works well for breaking down the greasy deposits. The surfactant helps lift the dirt away from the porous grout surface. Then you need to put in some physical effort to scrub it clean. This approach works because grout is more resilient than people realize. The material itself rarely changes color from normal household use. What changes is the accumulation of dirt on top of it. Once you remove that layer the original grout color emerges again. Many people waste money replacing grout that could have been cleaned. They see the discoloration and think replacement is the only option. But a proper cleaning method can restore grout to its original appearance in most cases.
- Baking soda: mildly alkaline, it softens greasy residues without attacking the grout.
- Dish soap: breaks down oils from cooking, skin, and detergents that cling to the joints.
- A soft brush: reaches into the tiny pores instead of just gliding on the tile surface.
- A microfiber cloth: traps the lifted dirt instead of smearing it from one joint to another.
- Clear rinse water: one last pass with fresh water only, to leave no soapy film behind.
Living with clean grout without turning into a cleaning robot
Once you’ve seen your “real” grout color again, you start noticing other people’s floors differently. Friends’ kitchens, office corridors, the tiles at the hairdresser’s. Those lines tell a story of traffic and habits. You don’t have to become obsessive, though. The goal isn’t perfection, it’s a feeling: walking barefoot and not being slightly grossed out.
A simple maintenance tip is to run a barely damp microfiber cloth along the grout lines in high traffic areas once every two weeks after your normal mopping routine. This takes about two minutes and requires no cleaning products or hard scrubbing. This small action prevents greasy buildup from forming again. You will appreciate this habit later.
| Key point | Detail | Value for the reader |
|---|---|---|
| Gentle products | Use baking soda and mild dish soap instead of vinegar or bleach | Protects grout and avoids harsh smells or respiratory irritation |
| Dry first, then targeted scrubbing | Apply the paste on dry grout and work in small sections with a brush | Removes deep dirt more effectively and prevents re-soiling |
| Simple maintenance routine | Quick wipe of the joints with a damp microfiber cloth every few weeks | Keeps grout clear longer with minimal effort |
FAQ:
- How often should I deep-clean my grout?For a lived-in home, every three to six months is usually enough. High-traffic zones like the entryway or kitchen may need a focused refresh a bit more often.
- Can I use this hack on colored grout?Yes, baking soda and mild dish soap are generally safe on colored joints, as they’re not bleaching agents. Test a small, hidden area first if your grout is very dark or specially tinted.
- What if my grout stays dark even after cleaning?That often means the grout is permanently stained or worn. You can look into grout pens to recolor it, or in more serious cases, have the joints lightly scraped and regrouted by a professional.
- Does this method work on bathroom tiles too?It works very well on bathroom floors and wall joints, especially where soap scum and body oils build up. For mold spots, you may still need a specific anti-mold treatment after cleaning.
- Can I do this on very old or crumbly grout?If the joints are cracked or turning to dust when you touch them, go gently and avoid aggressive scrubbing. Clean softly, then plan for a regrouting job, as cleaning alone won’t fix structural damage.