The smoke detector is making noise and the kitchen window is open while you look at a pan that appears to have been through a fire. The sauce has stuck to the metal and turned black around the edges while remaining sticky in the middle. You have already tried the usual response of putting the pan under cold water & thinking some choice words while assuming your non-stick coating is ruined. The pan sits in the sink looking worse than before. The burnt food has hardened even more from the temperature change. This is a common mistake that many people make when they panic. The cold water actually makes the burnt residue bond more strongly to the pan surface instead of helping to remove it. There are better ways to handle this situation that can save your cookware. The first step is to let the pan cool down naturally without using water. Once it reaches room temperature you can assess the damage properly. Fill the pan with warm water and add a few drops of dish soap. Let it soak for at least thirty minutes or longer if the burning is severe. For stubborn burnt spots you can make a paste using baking soda & water. Spread this mixture over the affected areas and let it sit for fifteen minutes. The baking soda works as a gentle abrasive that lifts the burnt food without scratching the pan. Use a soft sponge or cloth to scrub in circular motions. Another effective method involves using vinegar and baking soda together. Pour enough white vinegar into the pan to cover the burnt area & bring it to a boil. Remove it from heat and add two tablespoons of baking soda. The mixture will fizz and help loosen the burnt residue. After the fizzing stops you can scrub the pan clean. Your cookware can survive these kitchen disasters with the right approach and patience.
There’s a quiet moment when you wonder if you should just throw the whole pan out and pretend it never happened.

There’s another way.

The secret weapon hiding in your pantry
You probably walk past it ten times a day without even noticing. Not the bicarbonate, not the bottle of vinegar your grandmother used for everything, but a simple, humble product that’s already in half of the recipes you cook.

The day I found out about this trick I was cleaning a stainless steel pan at my sister’s house after trying to make an overly ambitious chicken and honey dish. The sugar had caramelized & then burned & then became a crust so tough it seemed like it was part of the pan itself. She watched me struggle for a minute and then calmly grabbed some dishwashing liquid and regular table salt. I looked at her like she had lost her mind. She just smiled and told me to squeeze some soap into the pan & then sprinkle a generous amount of salt on top. Then she said to use a sponge & scrub in circles. I was skeptical but I did what she said. Within seconds the burnt residue started breaking apart. The salt acted like a gentle abrasive while the soap cut through the grease. What I thought would take half an hour of soaking & scraping was gone in less than two minutes. The pan looked brand new again. Since that day I have used this method on all kinds of stuck-on messes. It works on baking sheets with burnt cheese and pots with scorched rice & even glass dishes with baked-on casserole remnants. The combination is simple but incredibly effective. You don’t need expensive cleaners or harsh chemicals. Just soap and salt and a little bit of elbow grease.
She poured dish soap into the warm pan and added three pinches of salt over the burnt area. Then she poured in some hot water. She did not need any special tools or long soaking time. These were just regular items anyone would use on a typical weeknight.
We left it on the stove over low heat for five minutes. When she handed me a wooden spatula and told me to try it the black layer lifted in strips like peeling off a sticker. There was no white paste and no strong smell and no smoke. I just felt a weird little relief like when a stubborn stain finally gives up.
The magic isn’t really magic. Dish soap is built to break down grease, but grease that’s burned needs more than soap: it needs friction and a bit of abrasion. Salt is rough enough to scrape without tearing up most surfaces, and hot water softens the carbonized layer so it can detach.
Unlike vinegar that is acidic & can damage some coatings, this combination works by softening & gently sanding rather than eating away at the metal. And unlike baking soda pastes that often dry out and become crusty the soapy salt bath stays active and slides into all the tiny grooves where burnt fat likes to hide. It’s the simple combination of basic ingredients that does the hard work.
# How Boiling Orange Peels Freshens Your Home Naturally in Winter
Boiling orange peels creates an instant & natural way to freshen your entire house during the cold winter months. This simple method releases essential oils from the peels that spread throughout your home and create a pleasant citrus aroma that lasts for hours.
## Why Orange Peels Work So Well
Orange peels contain natural oils that become airborne when heated in water. These oils have powerful aromatic properties that neutralize unpleasant odors instead of just masking them. The warm steam carries the scent through your rooms and creates a welcoming atmosphere that feels both clean and cozy.
## The Simple Process
Fill a pot with water and add the peels from two or three oranges. Bring the water to a boil and then reduce the heat to let it simmer. The steam will begin carrying the orange scent throughout your home within minutes. You can keep the pot simmering for several hours by adding more water as needed.
## Additional Benefits
This method offers several advantages beyond just a pleasant smell. The humidity from the boiling water adds moisture to dry winter air. The natural citrus scent can improve your mood and reduce stress. Unlike artificial air fresheners that contain chemicals this approach uses only natural ingredients that are safe for your family and pets.
## Making It Last Longer
You can enhance and extend the fragrance by adding other natural ingredients to the pot. Cinnamon sticks complement the orange scent perfectly & add a warm spicy note. Fresh herbs like rosemary or thyme create a more complex aroma. Vanilla extract adds a sweet undertone that many people find comforting during winter. This traditional method costs almost nothing since you would normally throw away orange peels anyway. It transforms a waste product into something useful while filling your home with a natural and inviting scent that guests will notice immediately.
➡️ To stop cities from collapsing into the ground engineers flooded hollow oil reservoirs and sparked a fierce debate over who approved this global gamble

➡️ How boiling orange peels instantly freshens the whole house and leaves a long-lasting natural scent
➡️ If you remember these 10 moments from decades ago your memory might be sharper than your doctors say and it is exposing a silent problem with dementia diagnoses
➡️ According to psychology, these 9 common parenting attitudes are the ones most likely to create unhappy children
➡️ Why people resist helpful advice from familiar sources
➡️ Psychology explains how emotional exhaustion can feel exactly like a lack of motivation, and why the two are often confused
➡️ Bad news for anyone who thinks they know aluminium foil: the shiny and dull sides really do have two different jobs – and the truth will divide your kitchen
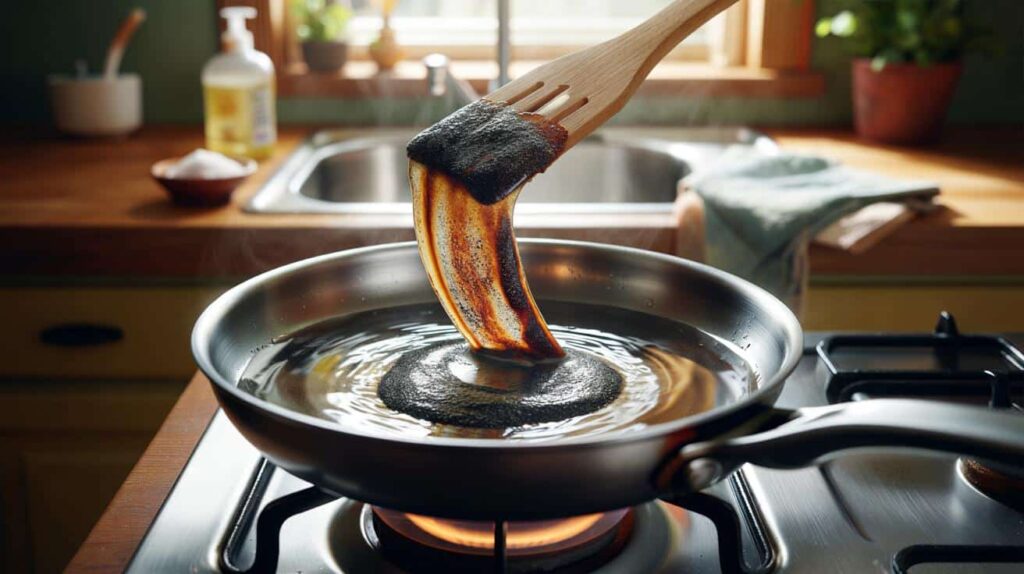
Exactly how to use it on your worst burnt pans
Here’s the method, step by step, the way real people actually do it on a weeknight. Don’t wait until the pan is stone cold. It should be warm, not sizzling, so you don’t warp it or splash boiling water.
1. Pour a generous line of liquid dish soap over the burnt area.
2. Sprinkle a good layer of regular table salt. Not just a pinch; think “light snowfall.”
3. Add enough hot (but not boiling) water to just cover the crust.
4. Put the pan back on low heat and let it gently simmer for 5 to 10 minutes.
Once you turn off the heat, let the pan sit until the water is simply hot to the touch. Then grab a wooden spatula or a soft sponge and start nudging at the burnt bits. You’ll often see pieces sliding away on their own, drifting in the cloudy water like ashes.
You can repeat the process for really stubborn spots instead of turning your sink into a battlefield. Nobody really does this every single day. But when a dish goes very wrong or you have inherited a pan that looks cursed this gentle simmer trick feels like hitting the reset button. The method works well for those moments when regular scrubbing just does not cut it. You fill the pan with water and add some dish soap or baking soda. Then you let it simmer on the stove for about ten minutes. The heat helps loosen all the stuck food and grime without requiring much effort from you. After the water cools down a bit you can wipe away most of the mess with a soft sponge. The burnt residue that seemed permanent before now comes off much easier. This approach saves your arms from getting tired and keeps your cookware in better shape than aggressive scrubbing would. Most people only need to use this technique occasionally. It makes sense to save it for the really tough situations rather than making it part of your daily routine. When you do need it though the results can be surprisingly satisfying. That pan you thought might be ruined can look almost new again with minimal work on your part.
Some people feel guilty when a pan gets that bad, as if a ruined base equals being a bad cook. That’s nonsense. A high flame, a distraction, a phone ringing at the wrong moment, and even a chef will burn a sauce to the point of no return. What matters is how you recover, not how you fail.
“Burnt pans don’t mean you’re a disaster in the kitchen,” laughs Claire, a cooking teacher who runs workshops in a cramped Paris studio. “They mean you were trying something that mattered enough to forget the clock for a second.”
- Use wooden or silicone tools once the crust softens, to protect non-stick coatings.
- Add a bit more salt if the crust is very thick, but avoid metal scourers at first.
- Let the pan cool naturally after the hot soak; plunging it in cold water can deform it.
- Rinse thoroughly to remove all salt and soap, especially around rivets and handles.
- Dry immediately with a cloth to avoid water stains, then store it fully dry.
Beyond the trick: what your pans say about your kitchen life
The bottom of a pan holds a strange kind of intimacy. You can see the tiny scratches and the faint rings left behind by old sauces. There is always that shiny circle where the flame hits the hardest. Every mark represents a story about meals that turned out well and meals that ended in burnt sugar & ordering emergency pizza. These marks are not just random damage. They form a record of your cooking history. The dark spot near the edge might be from that time you tried to caramelize onions but got distracted by a phone call. The cluster of fine lines in the center could be from years of stirring risotto with a metal spoon. When you flip a pan over and examine its underside you are looking at a map of your kitchen life. Some people never look at this side of their cookware. They focus only on the cooking surface and ignore what happens underneath. But the bottom reveals the truth about how you actually cook rather than how you think you cook. A well-used pan bottom shows commitment. It proves that this tool has worked hard over many dinners. The discoloration is not a sign of neglect but evidence of use. A perfectly clean pan bottom might mean the pan is new or it might mean the pan sits unused in a cabinet. The heat patterns tell you about your stove and your technique. An even circle of darkening means you center your pans well. An off-center mark suggests you crowd your burners or cook in a hurry. The intensity of the discoloration indicates your typical cooking temperature. Some cooks try to scrub away these marks. They want their pans to look new forever. But removing the patina from a pan bottom is like erasing the pencil marks that track a child’s height on a doorframe. You lose the history. The bottom of a pan connects you to everyone who has ever cooked. Professional chefs have pans with bottoms that look like abstract art. Home cooks have their own patterns. Each kitchen creates its own signature on metal.
When you realize that a bit of dish soap, salt, and patience can rescue what looked totally lost, something shifts. You stop seeing your cookware as fragile victims of your experiments, and more like reliable partners that can handle your learning curve. You feel freer to try that caramel, that sticky glaze, that slow reduction that scares you a little.
You probably won’t talk about this trick at a dinner party, but you might pass it on quietly to a friend texting you a photo of a blackened pan with the message: “Is this dead?” You’ll send back: “Warm water, dish soap, and salt. Low heat. Ten minutes. Don’t panic.”
And they’ll watch, like you did, as the crust lifts and the metal reappears. Not perfect, maybe. A tiny shadow here and there. But definitely not ruined. That’s the discreet magic of this method: it doesn’t promise new, it promises “good enough to keep going.”
The kind of gift we all need a bit more of in our kitchens.
| Key point | Detail | Value for the reader |
|---|---|---|
| Simple magic combo | Dish soap + table salt + hot water on low heat | Uses ingredients already at home, no specialized products needed |
| Gentle but effective | Salt acts as a mild abrasive while soap breaks down grease | Cleans burnt grease without destroying coatings or surfaces |
| Real-life friendly | Works in one or two short cycles, without overnight soaking | Saves time, saves pans, and lowers the urge to throw cookware away |
FAQ:
- Question 1Can I use this dish soap and salt method on non-stick pans?
- Answer 1Yes, as long as you keep the heat low and use a soft sponge or wooden/silicone utensil. The salt provides light abrasion, so be gentle and avoid scrubbing like crazy.
- Question 2Will this trick work on burnt sugar and caramel?
- Answer 2Absolutely. Burnt sugar softens very well in hot soapy water, and the salt helps detach the caramelized layer that usually sticks like glue.
- Question 3What if the burnt layer still won’t come off after the first try?
- Answer 3Let the pan cool slightly, rinse, then repeat the same process once or twice. Very old or thick carbonized layers can take more than one cycle, especially on the edges.
- Question 4Isn’t baking soda better than salt for this kind of cleaning?
- Answer 4Baking soda helps in some cases, but it often needs long soaking times and can form pastes that dry out. Salt offers immediate, controlled abrasion plus a texture that helps the softened crust slide away.
- Question 5Can I do this with cast iron pans too?
- Answer 5You can adapt it, but on seasoned cast iron avoid long soaks and heavy soap that might strip the seasoning. Use warm water and salt for abrasion, then re-oil the pan lightly afterward.